
Receive your first MQTT message in SHAPE without connecting a physical sensor. In this tutorial, you will send a sample temperature value from MQTTX Web and display the received data in Tactigon SHAPE.
You will use a browser-based client and a public broker. No additional client or broker installation is required.
What you will build #
The message follows this path:
MQTTX Web → public EMQX broker → Tactigon SHAPE
MQTTX acts as the publisher, simulating an external device. SHAPE acts as the subscriber, listening for messages on the selected topic.
The broker forwards messages between them. The topic identifies the channel, while the payload contains the data.
Before you begin #
You need:
- Tactigon SHAPE installed and accessible in your browser.
- An internet connection.
- MQTTX Web open in another browser tab.
If SHAPE is not installed, follow Install SHAPE with Docker first.
Use sample data only. The public broker is shared with other users. Do not send passwords, personal information or confidential data.
1. Connect MQTTX Web #
Open MQTTX Web and create a new connection.
Enter these settings:
| Setting | Value |
|---|---|
| Name | SHAPE MQTT test |
| Protocol | wss:// |
| Host | broker.emqx.io |
| Port | 8084 |
| Path | /mqtt |
| Client ID | Keep the generated identifier |
Connect and check that the client reports a connected state.
2. Configure your Shape #
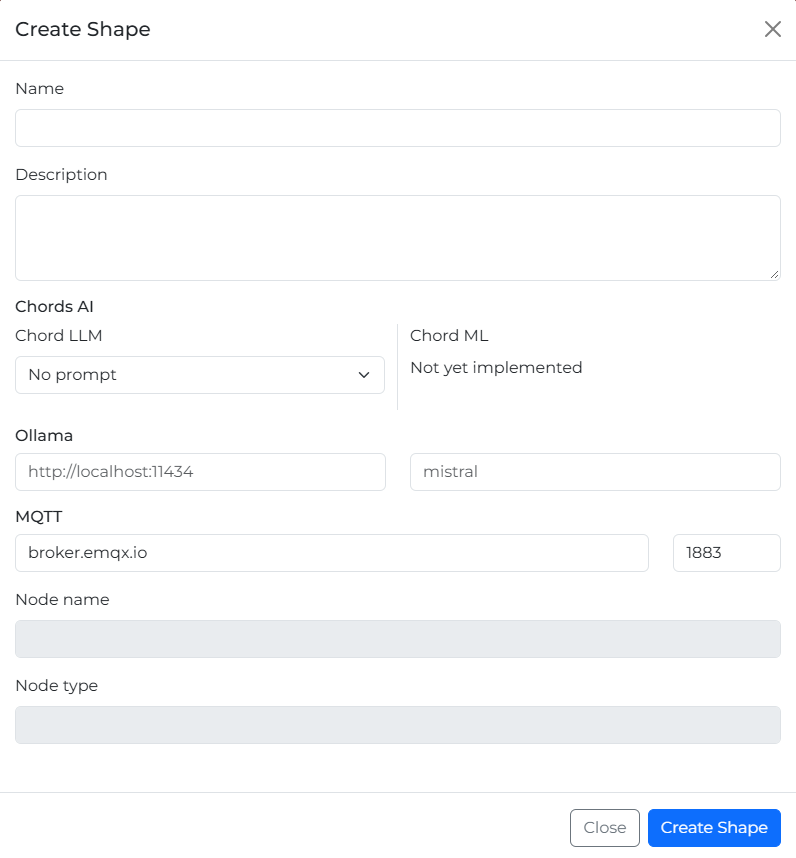
In Tactigon SHAPE, create a new Shape or open Edit Shape for an existing project.
In the MQTT section, confirm:
| Setting | Value |
|---|---|
| Broker address | broker.emqx.io |
| Port | 1883 |
Use the hostname without a protocol prefix. Save the configuration.
SHAPE uses a TCP connection, while MQTTX Web uses secure WebSocket. They connect to the same broker despite using different ports.
3. Add the MQTT reception block #
Open the visual editor and add the MQTT message reception block.
Set its topic to:
shape/inputInside its do section, add a Debug block connected to the received payload variable.
This tells SHAPE to display the incoming message whenever a message arrives on the topic.
Save and run your Shape before sending the test message.
4. Publish a sample temperature #
Return to MQTTX Web.
Set the destination topic to:
shape/inputSelect JSON as the payload format and enter:
{
  "Temperatura": 40
}
Click Publish.
The value is demonstration data entered manually. It does not represent a measurement from a connected sensor.
5. Check the result in SHAPE #
Return to the running Shape and inspect its Debug output.
You should see the received payload containing the Temperatura field and the value 40. The console’s formatting may differ from the JSON shown above.
You have now passed a message from an external client, through an MQTT broker, into your visual program.
If the message does not appear #
Check the following:
| Check | What to verify |
|---|---|
| Broker | Both applications use broker.emqx.io |
| Topic | Both use exactly shape/input, including letter case |
| MQTTX connection | The browser client is connected before publishing |
| SHAPE execution | The Shape is running before the message is sent |
| Debug block | It is inside the reception block and connected to payload |
The public broker is shared. To reduce interference from other users, you can replace shape/input with a distinctive topic name. Use exactly the same replacement in SHAPE and MQTTX.
Already using MQTTX Desktop? #
You can perform the same exercise with MQTTX Desktop.
Connect to broker.emqx.io using mqtt:// and port 1883. Keep the same topic and payload used in this tutorial.
Installation of MQTTX Desktop and deployment of a local broker are outside this guide’s scope.
Next step #
Continue to Send MQTT messages from Tactigon SHAPE to reverse the direction: SHAPE publishes a message and MQTTX receives it.


